Showing posts with label crafts. Show all posts

Saturday, May 17, 2008

Preparing for our referral

I have our referral announcements ready to go. The two Chinese knot versions are shown to the left, there is also a third version which is a flat note with a ribbon - no knot, but it does have a yuzen paper-lined envelope like the others. I also made matching envelope seals with Nora's initial.

The only thing left to do is add Nora's picture to the template and print!

I'm also working on an email announcement and our email
distribution list. I guess I could probably start addressing the envelopes for the paper announcements as well.

In other news, today we went to have visa photos taken - we need one photo each for our visas and two each for the adoption registration in China. I also checked our passports to be sure that we have at least 6 months validity and 2 blank visa pages. Rob would have been close, but for some reason he has two passports (one must have been lost at a time when he needed to travel) and the second has plenty of room left.

Here's a rough transcript of my conversation with the photo guy at the UPS store:

UPS guy: Smile less
Me: (smile less)
UPS guy: Less
Me: (smile less)
UPS guy: You know, you aren't supposed to smile at all
Me: How will they recognize me if I'm not smiling?
UPS guy: After a 20 hour flight and standing in line at customs, you won't be smiling.
Rob: (laughs)
Me: (thinking ... I'll be in China to get my baby, no chance I won't be smiling)

I did come away with pictures where I'm smiling a little (no teeth though- the UPS guy wasn't going to push the button if he saw teeth). Thanks to my Dad, I always smile with teeth; it looks better that way, right Dad??

Saturday, April 26, 2008

Amazing China

First of all, have you seen the new National Geographic?? It's a special issue about China (click on the magazine title above to link to their site). I bought two print copies at Borders this afternoon - one to read and one to save for Nora.

I haven't read the whole magazine yet, but I've read enough to be inspired to do the "About China" page for Nora's lifebook as this week's digi-scrapping homework (topic was recoloring an element - I recolored the filmstrip and the dragon sticker)

Paper - Confucius Says by Heather Roselli for Sweet Shoppe Designs

Photostrip Element - Adapted from Amy Teets Birthday Mini Elements

Dragon Element - Adapted from Maria LaFrance Journeys of the Heart

Fonts - 1001 Free Fonts Chinese Takeaway and Font Garden Astrid

Saturday, April 19, 2008

New PSE skill - spot of color

This week's Photoshop lesson was making a color photo into b&w and then reintroducing some of the color. I did a little still life of the stuff on top of our office armoire. Isn't this the coolest thing?! I think there are some great possibilities for using this technique with baby photos.


I also learned to make my own patterned paper. I made a dot and a plaid, which I used in a layout with the photo above. Really, though, the photo is the star.

Love my Photoshop class!!

Sunday, March 23, 2008

First lifebook page??

I'm really enjoying my digital scrapbooking class! We did three layouts this week - one using drop shadows, one using a layer template and one using the text mask and eraser tools. After doing the first couple of layouts, I realized that I should be taking this opportunity to work on some projects that I need to accomplish anyway, so my text mask assignment was an attempt at a page for Nora's lifebook. I'm not sure I'm happy with the text color that I used in the journaling, so I might go back and do a little tweaking later. Otherwise, I'm pretty happy with it.


Credits: Kay Miller Designs (paper), Kristi Mahrt/ Little Lotus Creations (ribbon, adapted) and Tammy Conlan (scalloped frame) for Journey of the Heart

If you can't read the text, it says:

There is a tradition in parts of China where, to welcome a new baby, each family in the village contributes a piece of cloth, along with their good wishes for the baby. The scraps of cloth are then sewn into a quilt which contains the luck, energy and good wishes of all the people who gave a piece of fabric.

While we were waiting to bring you home from China, we decided to collect fabric squares and good wishes from all the friends and family who love you and who were waiting for you to come home. Then mommy learned to sew and made them into a quilt for you. We call this your one hundred good wishes quilt.

I really highly recommend the godigitalscrapbooking classes - it is a very encouraging group!

Saturday, March 15, 2008

Digi-scrapping - learning a new skill

I've started taking a digital scrapbooking (Photoshop Elements) class online at Go Digital Scrapbooking. This is the end of the second week and I think it's going pretty well - I've learned way more about PSE in the past two weeks than I'd picked up in a year of trying to learn on my own with a book.

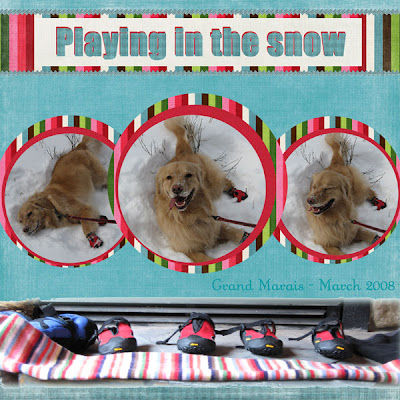
This is my assignment for this week - the assignment was using selection tools and layers. We were also supposed to create photo borders. The header wouldn't have been my choice, but it is somewhat in keeping with the assignment. I do like the way the bottom portion of the layout with Maddie's boots drying by the fire came out, though. Maybe I'll rework it a little later.

Really, I'm trying to prepare for making Nora's referral announcements, baby book, lifebook and our travel journal. I tried paper scrapbooking a while back and it didn't go very well. Digi-scrapping seems to be much more my thing (and I don't get glue all over the place). Hopefully by the time Nora comes along I'll have gotten the hang of it.

Update 10:29pm - after some more playing, I have what I think is an improved title. What do you think?

Credits: Digital papers from Emma's Smile by Danielle Young

Wednesday, March 12, 2008

Work in progress

A while back I mentioned my desire to make Nora's referral announcements (click on "referral announcements" to see that post). Well, after one card making class and some email conversations with my friend Z's lovely wife J, who is an avid scrapbooker, I came up with some good prototypes. The problem was that I needed a tag or something from which to "hang" the Chinese knots that I bought.

After much Google-ing, I found these rubber stamps (click here for more info about the stamps). They are a bit larger than I'd like, but other than that they are darned near perfect. I couldn't decide between "I Love You", "Dreams Come True" or "Blessings", so I ordered all three.

Next problem (of course) was that I knew nothing about rubber stamping, other than what I learned in card making class. Obviously I needed to take a rubber stamping class. Tonight was my free* rubber stamping class and it was FANTASTIC. I tried a ton of products and made all these samples (click on the photo to see a larger version). THEN I went shopping!

I'm feeling pretty good about this. I'm not sure that I want to reveal the card, though, until after Nora's referral. I don't want to spoil the surprise for the people on our mailing list! I'm working on an email announcement too, by the way. If you're curious, here's a little preview of the yuzen paper lined envelopes. There are three different versions because I wasn't able to get enough materials to make them all the same. It's actually a good thing, because I now like "plan B" better than "plan A".

* the class was free, but then I bought a whole basket full of stamping supplies!

Sunday, December 09, 2007

"Green" gift wrap

Last weekend I mentioned this year's greener Christmas and my hope that we will be able to waste less on gift wrap. I know that I don't have time to make enough reusable gift bags to do all our gifts (plus I have a lot of stockpiled gift wrap to use up), but I did make a few for small gifts. I'm not an experienced sewer and am not really used to making things without a pattern, but I was able to eventually figure out how to make a simple drawstring gift bag. I think they're pretty cute and I was happy to be able to use some scrap fabric from my stash and add a little less to the landfill.
Here's a shot of two of the bags - one flat and one cinched up.

Rob's Yoga Journal magazine even has an article about gift wrap this month. They mention a website called Wrapsacks that sells reusable gift bags and lets you track them online - how cool is that?! They are also beautiful and very reasonably priced at $4-$10 each.

Other environmentally-friendly wrappings mentioned in the article are:

  • Furoshiki (a Japanese method of fabric wrapping)
  • Paper bags decorated with stencils or crayons
  • Out of date maps or old sheet music
  • Reused/repurposed vintage containers such as cigar, shoe or hat boxes
  • Natural materials such as raffia, string or fabric instead of synthetic ribbon
  • Natural gift box fillers such as leaves, straw, pine or shredded paper scented with essential oils

Happy wrapping!! If you have other creative ideas, please share!

Saturday, October 20, 2007

Attention artsy and creative people! Your help is needed!

You might remember my toy box project. Like all my projects, progress has been slow ... but I do have a couple of coats of paint on it and a cushion made (making the cushion, by the way, was far more difficult than I'd expected). Here's what it looks like right now. Sorry to make you look at our messy garage, but that's where it is at the moment.

You can't tell in the picture, but the toy box has some dings in it. Dings that are more obvious now that it's painted white. It doesn't really bother me that it has dings, but I wonder if it could look better.

Tell me. What would you do with this? Paint the spindles a different color? Paint something on the front of the toy box (I was thinking maybe the word "play")? Leave it as it is?

I do want to quickly show you the inside - it's my favorite part. For some reason, lime green just makes me happy.

Saturday, June 16, 2007

I want to be the fun mom

My mom was (and still is) the fun mom and I want to be able to give our kids that kind of experience as they grow up. Life is quite nice when your mom is a happy, fun-loving person.

Anyway, we are expecting a young house guest, j, in a couple of weeks. j told her mom that she wants to host a birthday party while they're here, so I've been thinking about how we can do that. The one thing that I always wanted at my birthday party as a kid (and never got - there's a lesson, even the kid of the fun mom doesn't get everything she wants*) was a piñata. So, I decided that we would make a piñata.

I don't think that I've done papier-mâché since the 3rd grade, so I went to the internet looking for a recipe and perhaps some instructions for a piñata. If you haven't already discovered it, Family Fun magazine has a terrific website with all kinds of great ideas, including instructions for a hot air balloon piñata. I decided to do the papier-mâché part before j gets here and then hand it over to her for decoration, which turned out to be a good idea since it needs three coats of papier-mâché and needs to dry for a full day between coats. I also had a little mishap with the first balloon and needed to start over.

Here's a photo of the work in progress. Pretty cool, huh?


The paste recipe is also way better than what I remember using in grade school and it's super-easy.

Papier-Mâché Paste (from Family Fun magazine)

  1. Combine 1/2 cup all-purpose flour and 2 cups cold water in a bowl.
  2. Add this mixture to a saucepan of 2 cups boiling water and bring it to a boil again.
  3. Remove from the heat and stir in 3 tablespoons of sugar.
  4. Let it cool; it will thicken as it cools. Once it does, it's ready to use.

My learning: be sure to let the paste cool all the way before you use it, otherwise it causes the air in the balloon to expand when the papier-mâché is applied and contract as it cools. It will mess up your project. What I do now is cook up the paste in the evening, let it cool uncovered until bedtime then cover with plastic wrap and let it sit on the counter until morning. If I get an early enough start I can get a coat on before work. It seems to take about 45-60 minutes per coat and I'm using a fairly large punch ball instead of a regular balloon.

I think I might have to subscribe to Family Fun.

* I also did not get a dog, imo a mistake on the part of my parents. Every kid should have a dog. Obviously I am making up for that in adulthood.

Saturday, February 17, 2007

... pink knitted booties topped off with bling, these are a few of my favorite things

Wendy from the Dec DTC group has an Etsy store called The HeiWen Way where she and her friend sell all kinds of neat soaps and stationery and stuff. My favorite item was these baby booties -- I just had to order them for Nora! They are so cute with the "bling" at the top. They must look suspiciously like a dog toy, though; Maddie is fascinated (or maybe she just likes the bling?). I hope that she doesn't try to steal them off Nora's feet!

Monday, January 01, 2007

The start to a productive year

The new year is off to a productive start at our house. Today I not only finished cutting 848 1-1/2" and 121 2-1/2" background squares for Nora's quilt, but I also finished her butterfly bookends.

I'm not sure I ever mentioned it here, but several months ago I purchased unfinished wood butterfly bookends for Nora's room. I couldn't find anything pre-finished that I really liked, so I decided that I would paint something to match her bug art and wall letters. It took a couple of trys, but I finally have something that I can live with.

Thursday, August 03, 2006

Don't just sit there ... PAINT something!

For several months I've been admiring those pretty painted letters at places like Posh Tots and Pretty Personal Gifts, thinking about ordering, but never quite taking the plunge. Then the other day I went to JoAnn fabrics to get thread, and some plain wooden letters caught my eye. On a whim I decided to paint my own.

I wanted them to coordinate with the bug prints that I got a while back at Target. Remember the bug prints? That post is here. I'm no artist, but I think I got pretty close. I'm still trying to decide if I want to put bows on top of them like they do at Posh Tots. I like the look, but Rob won't let me put holes in the wall, so I'd have to figure out a way to hang them with Command adhesive and still have them look right.

While I've been making letters, Rob has been working on his own construction and painting project - shelves for Nora's room and our bathroom. We hope to have them finished and installed on Saturday, so stay tuned!